Songbird Attire
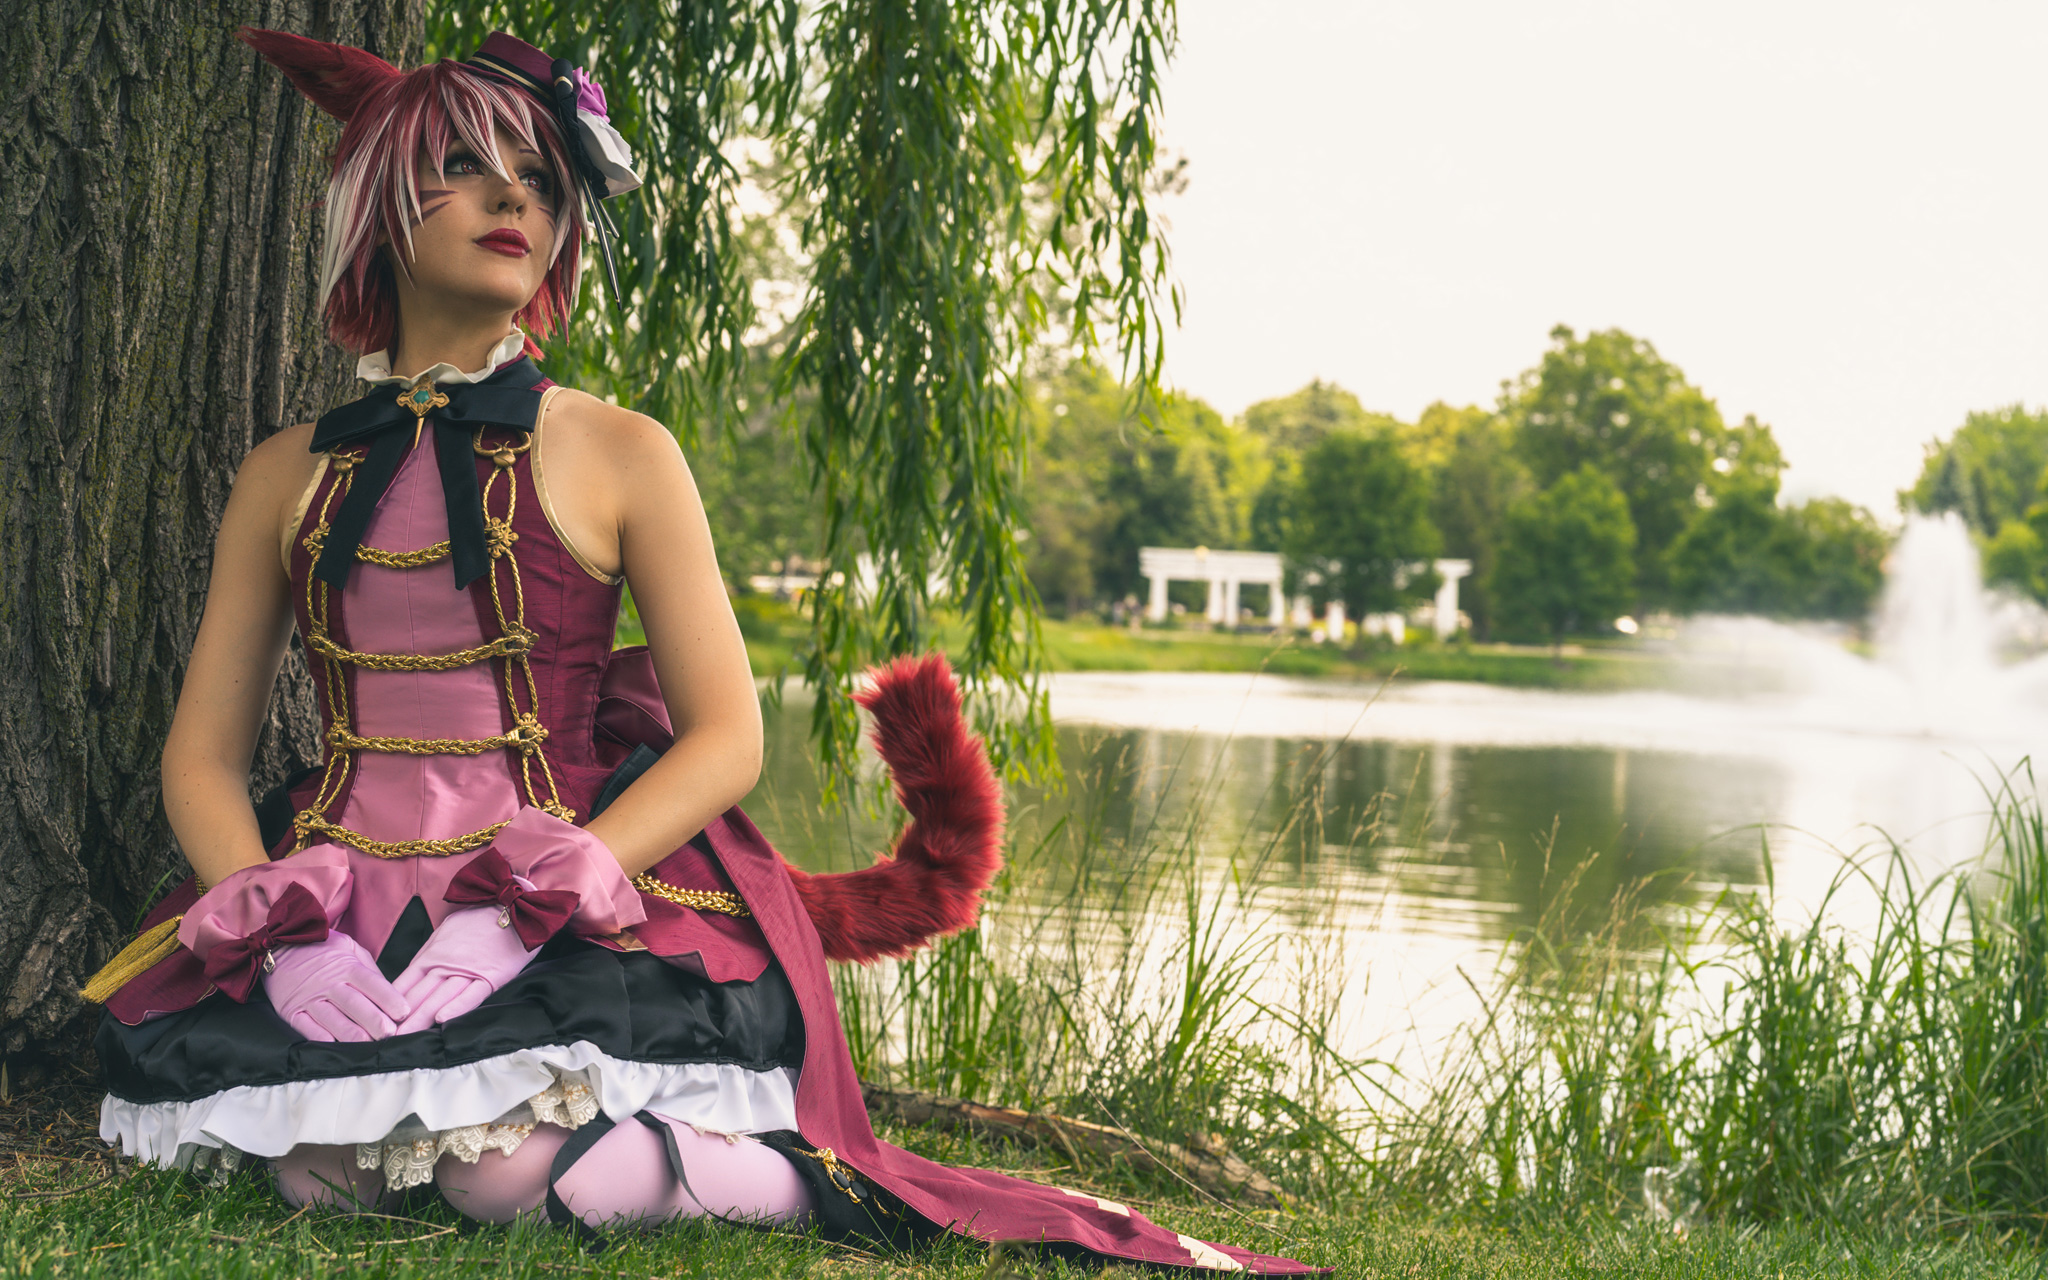
I’ve always enjoyed making idol costumes, so when I started playing Final Fantasy XIV and saw the Songbird Attire, I absolutely had to make it! I originally tackled the Songbird design as a commission for Dejavudea, and then I had the chance to make my own for FanFest 2018. I ended up having to cancel the trip due to an eye infection… but I was finally able to wear this costume with some fellow Songbirds at Katsucon 2019!
To make the fascinator, I started with a small top hat millinery base, which I covered with red shantung. I added the black ribbons using satin and gold ribbon; the black ruffle using plisse; the white ruffle using satin and a layer of white floral sequins. The rose is made of foam and was painted with airbrush acrylics. The hat attaches to the wig with large alligator clips. [Tutorial coming soon!]
Instead of using a regular petticoat, I took this opportunity to teach myself to sew a cupcake hoop skirt. This was in order to stay true to the “hollow” model of the Songbird skirt in TexTools. (Originally, I was planning to make the underskirt, too, but ultimately ran out of fabric and motivation.) The cage had five hoop levels using 1/2″ boning. The waist closed with a parachute clip, situated at the hip so as not to add extra bulk to the waist. Lastly, I created a two-tiered petticoat slip out of soft netting to smooth over the hoop tiers. I attached my scalloped lace to the lower hem of the outer layer of the petticoat.
I used peau de soie satin for both the black and white fabrics of the skirt. It consisted of two layers: one white, one black. Both were comprised of large rectangles that were gathered into a waistband. I gathered a ruffle to the lower hem of the white skirt, then pleated the lower hem of the black skirt and topstitched it to the ruffle hem. To finish the skirt, I attached hooks and bars to the waistband while leaving a slit for the tail, the edges of which I finished with my serger and topstitched to create a finished rolled hem.
I drafted the Songbird jacket pattern from scratch by draping it on my dress form. The main fabric is shantung sateen, while the contrast fabric is a rose bridal satin. The shirt front is a false panel that is topstitched in place; the front of the jacket does not open so that all of the front detailing is permanently fixed in place. Instead, the jacket opens in the back with a separating zipper. Both sets of coattails are interfaced and have horsehair braid to reinforce and define the shape.
The 3D models for the gold accessories were designed by Full Health Cosplay; I printed, primed, and painted them. They were attached to the jacket with E6000, as were the majority of the gold braided accents. The back bow attaches to the back of the jacket with snaps.
I purchased the base gloves from WeLoveColors. I added the ruffles using the same rose bridal satin as the jacket, made little bows for the wrists out of shantung, then stitched both the bows and little diamond charms on by hand.
To make the ruffled garter, I cut out a rectangle of shantung, interfaced half of it, then folded it in half hot-dog style. I made a small ruffle by box pleating a long strip of shantung, then stitched that to the lower hem of the rectangle. The ruffle closes in the back with snaps. [Tutorial coming soon!]
For the floral garter, I created the fabric by drafting the design using Adobe Illustrator, then having it custom printed on short pile velvet from Spoonflower. (If you’re interested in using it for your own Songbird costume, you can purchase it here.) I added loops with white satin ribbon, then threaded a black ribbon through and stitched it into place. I made a fake bow for the side attached each piece separately. This garter closes with snaps as well. [Tutorial coming soon!]
My base boots were originally knee-high. I folded them down and hand-tacked them into place from the inside. The gold knots for the side were made using the same golden leather braid as the jacket accents and stitched them on by hand.
I have two tails that I wear for R’sylia: one that is very stiff and posable, and another that is articulated so that it has movement. I followed this tutorial from Pluto Knights for the former, using 4-gauge copper wire as the core.
The base of R’sylia’s wig is a Jaguar in Maroon and the highlights were added using a pack of Short Wefts in White, both from Arda Wigs. I sewed in the wefts by hand, trimmed the bangs and side spikes, then styled each section with hairspray and tacky glue to seal the tips. The Miqo’te ears were made by creating a base with Black Worbla, attaching 16-gauge wire loops to the back with Worbla scraps, and covering the front with pink felt. I used my airbrush to add a dark red gradient to the pink felt. Finally, I glued red shag fur to the back of the ears, folding it over the front edges. (Note: For my original pair of ears, I shaved down the fur, but I ended up remaking them and keeping the longer pile. Instead of shaving them, I used hairspray to shape the fur while giving it a slight trim here and there.)
Overall, this was a challenging costume, but the end results were so worth the difficulties! It feels super cute to wear, and it’s a fun to be able to combine an idol-style design with Final Fantasy aesthetics.
(Featured photo by Avid.Exposure.)